Monday, September 30, 2019

Place Values


Learning About Place Values

Hello! I am getting ready to start teaching my first math unit. I will be teaching my third graders about place values. I remember when I taught place values to my first graders when I student taught, it was a hard concept for them to understand. I came up with the idea to make note cards to help make the learning interactive and fun. It really worked so I plan on doing the same for my third graders!


The Set-up

First you need to get a set of index cards, sharpies and tape. Depending on the grade, will depend on how many index cards you need. In third grade, in the beginning, they are supposed to know up to the hundreds place. So I made my cards up to that. You will first want to make single cards and number them from 1-9. At the bottom of the cards, you want to write "ones". These cards will be in the ones place. Make sure you label these cards in sharpie.


Next, you will number cards 10, 20, 30, 40, 50, 60, 70, 80, and 90. For each number you will grab two cards. On the first card, you will write all the numbers in the tens place (1-9). Underneath those numbers, you will write tens. These numbers will be in the tens place. On the other cards, you'll write 0. Underneath the 0, you'll write ones. The zero is in the ones place. Then you will flip the index cards over and tape them on the back. Make sure you label these cards in a different color sharpie.

Finally, you will number cards 100, 200, 300, 400, 500, 600, 700, 800, and 900. For each number you will grab three index cards. On the first card, you will write all the numbers in the hundreds place (1-9). Underneath those numbers, you will write hundreds. These numbers will be in the hundreds place. On the second cards, you'll write 0. Underneath the 0, you'll write tens. The zero is in the tens place. The last set of cards, you will write 0. Underneath this zero, you'll write ones. This zero will be in the ones place. Then you will flip the index cards over and tape them on the back. Make sure you label these cards in a different color sharpie.

Utilize in the Classroom

Now that you have your cards set-up, you can start teaching with them! These are awesome with teaching math concepts and getting students to understand what each place value actually means. 

I am going to start my lesson by holding up one of the single digit cards.

I am going to ask my students what the number 8 really represents. You want your students to understand that the 8 represents 8 ones. I will draw 8 ones on the board, count them, and them show how it equals 8. You can also use ten blocks and ones cubes. I will repeat this with a couple more cards

Next, I will hold up a 2 digit card.

I will ask my students what the number 90 really means. I will point out how there are zero ones in the ones place. And 9 tens in the tens place. I will then use the terminology that the number in the tens place shows you how many groups of ten there are. So in the number 90, there are 9 groups of ten. I will then draw 9 tens on the board, add them together, and show how it equals 90. You can also use ten blocks and ones cubes. I will repeat this with a couple more cards

Finally, I will hold up a 3 digit card.

I will ask my students what the number 800 really means. I will point out how there are zero ones in the ones place. There are zero ones in the tens place And 8 hundreds in the tens place. I will then use the terminology that the number in the hundreds place shows you how many groups of hundreds there are. So in the number 800, there are 8 groups of one hundred. I will then draw 8 one hundreds on the board, add them together, and show how it equals 800. You can also use hundreds blocks to help represent this. I will repeat this with a couple more cards

The beauty of these cards, are that you can lay these numbers on top of each other. They are all labeled with what place value is shown. Take the number 575

You can lay down the 500, then 70, and then 5. You can then ask students how many ones are in the fives place. You can hold up the five if need me to add an extra visual. Then ask students what the five means. It means there 5 ones in the ones place. You can ask the students how many tens are in the tens place. You can hold up the 70 card. Students will see that there are 7 tens. That means there are 7 groups of tens. You can ask how many one hundreds are in the hundreds place. You can hold up the 500 card. Students will see there are 5 one hundreds in the hundreds place. That means there are 5 groups of one hundreds.

Expanded Notation

You can also show expanded notation visually with these cards

If you take the number 454, you can lay the cards out so students can see you are adding 400 + 50 + 4.  You can do this with all numbers 1-999 with these cards!

Student Involvement

I plan to have students on the carpet with dry erase boards and markers when I teach this lesson. They will be writing everything I write on the board, on their boards. If I show the number 70, I plan on having them show me by writing out what the number 70 really means. Which is 7 groups of ten. They will write out 10 + 10 + 10 + 10 + 10 + 10 + 10 = 70. 

Students can also pick out three cards for you to dissect and break apart. They can choose a card from the ones, tens, and hundreds pile. Make a number and then break apart what that number really means.

You can also give each student hundreds, tens and ones blocks. They can model what number you show. 

Extra Information

I also laminate these cards so I can reuse them. You can also have these cards at a math center for students to practice with.

In Conclusion

I really hope you love this helpful tip on how to make teaching place values interactive and fun! My first graders loved this and I hope my third graders love it too. If you choose to make these cards, let me know how your students like them in the comment section below!


Saturday, August 17, 2019

Get in Touch With Your Emotions

Relaxation Zone

I am so excited to share with you my relaxation zone in my classroom! Every child needs a space where they can go when they're feeling overwhelmed and need a break. There is a lot of things you can create in your classroom to help your students relax and calm their bodies. You can have a sensory path, do brain breaks, have them walk to another teacher's classroom to take a break, etc. You can also create a safe space within your classroom where a child can go to get away from it all. That place is typically called a "calm down corner", and in my classroom it will be our 'Relaxation Zone'!

My relaxation zone is inside out themed and I will have a separate secluded desk where my students can go to relax and unwind. If a student is feeling overwhelmed and needs to take a break, they can go here and calm down until they're back into their happy zone and ready and able to learn.


Inside Out

Why Inside Out? What better way to help students learn how to handle their emotions! I love Disney and I think there is a lesson in a lot of their movies, that can be utilized in the classroom. Kids sometimes have trouble dealing and handling their emotions and don't know how. Inside out helps explain their emotions and what they are feeling when each one is present. On YouTube, there are short clips (no more than a minute) of each emotion. I plan to start the school year off showing each emotion to my students: Fear, joy, anger, disgust, and sadness.

I will first choose an emotion to show. As a class we will all watch the clip of that emotion. I will then ask my students follow up questions. How can you tell the girl in the video was feeling joy? Tell me a time you felt joy. What can others do to make you feel joy? What can you do for others to help them feel joy? What can we do to help people in our school feel joy? And I do the same process for each emotion (I do one emotion each day). It takes about 10 minutes total and can be done during morning meeting.

How it Works

I am going to have a desk that is my designated relaxation zone. On the desk will be various breathing techniques for the student to utilize.


I will have a bunch of coloring pages for the students to color on. There will also be writing paper for the students to write. They can also"Write and Let it Go". Where they can write and or draw what is going on with them. They can then crumple it up and let it go by throwing it away in the trash. This can help with releasing negative energy they have building up inside.
There will also be a bunch of fidgets and stress balls for my students to play with and squeeze to help them relax their bodies.
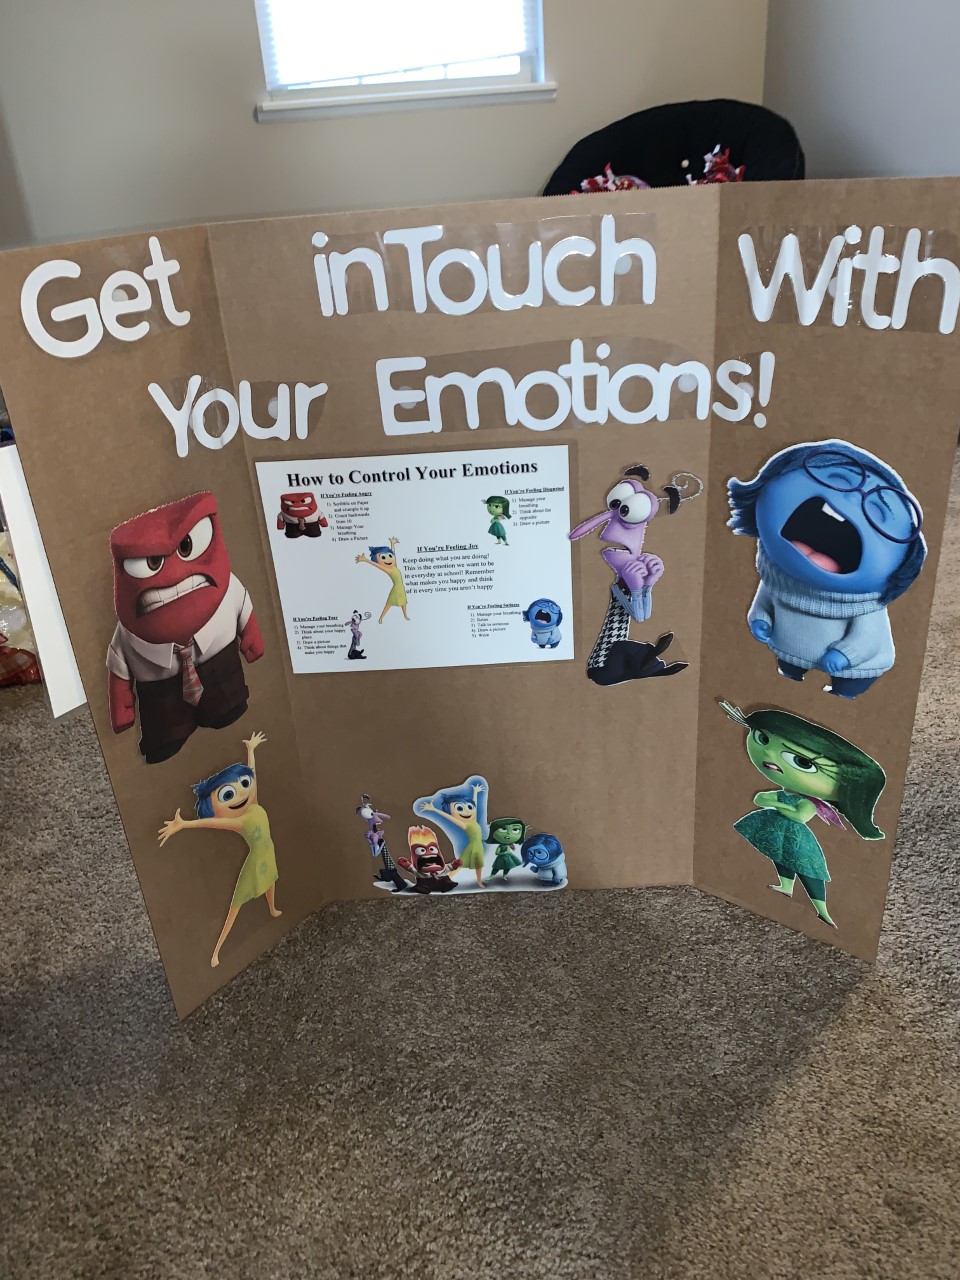
I will also have an interactive relaxation board to help students get in touch with their emotions

If a student is feeling overwhelmed and cannot continue on with what they are doing, they can come to the relaxation corner. They can do this by doing one of 2 things. Raising five fingers motioning to me that they need to "Take a Five" in the relaxation corner. Sometimes students are so overwhelmed and they don't even want to talk. Raising five fingers will let me know that they need to go cool their body off. The last way is just by telling me they need to go to the relaxation zone. 

They can come here and utilize any of the things at this table. This is time for them to figure get in touch with their emotions and get back to a happy one!

How to Utilize the Board

My relaxation board is interactive and has many components to it. The front of the board has a paper that tells you how to control certain emotions.
Students can read this and get tips on what to do if they are feeling anger, disgust, fear, and sadness. If students are feeling one of these emotions, this is a place they can go. The goal is to get them back to Joy and have them regroup with the classroom.

Also on the board are blown up emotions. These can detach from the board!
Students will choose which emotion they are feeling when they are at the relaxation zone. They will then take that emotion and place it on the side of the board. The side of the board has a 'How are You Feeling' paper.
Students will take the smiley and mark what emotion they are feeling. They will then take the check mark and mark if they want to talk or not. This part was really important for me to include. We have to remember that not everyone wants to talk all the time. This piece will let me know if they need some space to relax and unwind for a little bit.
Students will mark all of that and place the emotion they are feeling. I will look and quickly see if they want to talk or not. If they don't I will leave them alone and keep doing what I was doing. 
If I walk over and see that they do want to talk, I will talk through whatever emotion they are feeling with them. I will refer them to the paper on the front of the board that gives them tips on how to deal and handle that emotion. I will walk away and when they feel like they are ready to be alone and will check in on them occasionally.

It is important to check in on them occasionally because how they are feeling can change. They can mark what emotion they are feeling and note how they don't want to talk
They can then mark how they are still feeling the same but are ready to talk
The ultimate goal is for them to reach Joy. You want to make sure to tell your students to mark when they are feeling better. This is a time for them to leave and join the group again
They also might want to talk through with you how they went from one emotion and what they did to become happy again. You might also want to note what the student did in case they are back in the relaxation corner. This way you can remind them on what worked last time!

In Conclusion

I really hope you like my relaxation zone! I am so excited to utilize this inside my classroom. Social and Emotional health is so important. I hope this is a great way for my students to understand why they are feeling the way they are, and figure out healthy ways to cope with it!

Tuesday, July 30, 2019

How to Utilize Pool Noodles Without a Pool


Fun Extension Activities


Hello!

I have created two fun extension activities involving pool noodles. One for ELA and the other for math. The best thing about these activities is that you can get ALL of your supplies at the dollar store!


Spelling Frenzy

In my class, I will be giving out weekly spelling tests. I remember growing up, I had a spelling book. Each night we had to do a page out of the book to practice our spelling words. I was not a fan of these spelling books. I was more of a hands on learner. 

When teaching spelling this year, I wanted to think of the best way I can teach spelling while incorporating multi-modalities. Every child learns different, and I want to make sure I reach all of them. My spelling schedule will go as follows:

  1. Monday- Introduce the Spelling words
  2. Tuesday- S P E L L it
  3. Wednesday- Spelling Frenzy
  4. Thursday- Sparkle 
  5. Friday- Spelling Test
In this blog, I will be teaching you how to play Spelling Frenzy. All of the supplies you need, you can find at the dollar store:

Towel Racks

Buckets

Pool Noodles
The first thing you will need to do is cut up 3 pool noodles of the same color. I chose lime green. Grab a ruler and mark off every inch on the noodle. Then cut the noodle with scissors. Then grab one noodle of another color, I chose red, and cut that noodle the same. The lime green noodles will have all of the consonants written on them. The red noodle will have all the vowels on them. Make sure you write the letters horizontal, or else it will not work with the game.
Consonant and Vowels
After you create the letters, you can put them all in your buckets for storage. Once you take them to school, you can explain to your students how the game will be played. You will divide your students into 2 groups (or more if you get more towel racks). You will ask for one person from each group. You will dump all of the letters on the floor in front of them. Each team will get a towel rack. You will then write one of the spelling words on the board. When you say go each person will dig through the letters to find the correct ones to spell the spelling word. (For a challenge you can just say the word instead of writing it on the board!) 
Spelling Frenzy

This is a fun interactive way to have your students practice Their spelling words

Fraction Action

The last game utilizing the pool noodles is for learning fractions. The first thing you need to do is get a ruler and cut 4 different color noodles. Make them each a foot long. Then cut one into halves, fourths (quarters), and sixths.

You can use this in multiple different ways. You can use it to demonstrate how a fraction is one part of a whole. You can take the two halves and show how 1 of the halves is one half of a the whole noodle (for Ohio Standards this is 3.NF.1). 

You can also show equivalent fractions. You can show how 1 whole equals 4 quarters. (Ohio State Standard 3.NF.3)

You can also use these for a math center. You can create cards that tell students to make equivalent fractions. For an example: Find a fraction that is equivalent to 1 half (Answer: 2/4)
You can get a nice bucket to store these as well. And feel free to get extra colors to make different fractions.


Job Offer

Hello!

I have accepted a 3rd grade position for Columbus City Schools! I am so excited and school starts in less then a month. I am lesson planning all throughout summer. I get to see my classroom this Thursday and will start decorating. I will be updating my blog all throughout the school year to inform you on all the exciting things my class will be doing!

My school also doesn't have an ELA curriculum. I have decided to create me own and use it in my classroom. I will be sharing my tips, tricks, and struggles on creating your own curriculum. I am really excited that I decided to this. It will allow me to use more of my creativity and create more hands-on learning in my lessons.

Thanks for following and I hope you enjoy my journey as a first year teacher!

Monday, November 5, 2018

Battle of the Books: November

To increase the love of literacy, I have decided to implement something new that we are going to do every month in our classroom. It is called Battle of the Books. I got this idea from a Facebook group I am in. Every month you pick a children's author and you read their books to figure out which book is the best. Each week you vote on books (bracket style) until you are down to the final one that will be the winner. For the month of November we are focusing on James Deans' Pete the Cat books.

With elections tomorrow, I decided to integrate Social Studies into this lesson and tie in a unit about the importance of voting! I was so excited to teach my students this unit and they had a lot of fun with it too.

The Social Studies standard I chose to focus on was: Government 1.9 (Collaboration requires group members to respect the rights and opinions of others.)

The ELA standard we focused on was: W.1.1 (Write opinion pieces that introduce the topic or name the book being written about, express an opinion, supply a reason for the opinion, and provide some sense of closure.)

I started off with a PowerPoint I made about voting. Click here to view the PowerPoint I made for my class. The first two slides listed the standards stated above and broke them down into simpler terms for my students. The third slide talks about why voting is important. I told them what voting means, why we need to vote and who is allowed to vote. I explained to them that even though they can't vote in the elections tomorrow, they can still go with their parents to vote. I also informed them that there were other ways we can vote, like in our classroom.

I then introduced Battle of the Books, and informed them how we will be voting on books in our classroom every month to find out which book is the best.
The first two Pete the Cat books we read were Pete the Cat and His Four Groovy Buttons and Pete the Cat Rocking in My School Shoes. Before we read,  I had 5 students stand up to give them a better visual of why it's important to vote. Three students on one side (group B) and two on the other (Group A). I gave each group a book. I told the class that the two students in group A voted for their favorite book while only one of the three students in group B voted for their favorite book. Even though more people liked the group B book, only one vote counted and group A won. If all three people in group B voted, their book would have won. I explained to them how that is the reason why it is so important to vote, so everyone's voice can be heard and why every vote counts.

Then we read both books. The reason why I love Pete the Cat is because of the music. My kids loved the book and enjoyed dancing along to the music. In between each story, I asked my students what are some things they liked about each book. This was to get them thinking and start formulating their own opinions on what book was better.

Afterwards, the students all went back to their seats and I explained the writing portion of the lesson. Each student got a piece of writing paper and I explained to them how everyone was going to write down what their favorite book was and give an example why.
My students still can't write yet so I gave them two sentences already written out and they had to fill in the blanks.
The first sentence, students had to fill in what book was their favorite. The second sentence they had to fill in their reasoning on why that book was their favorite. I also had pictures of the book on the board and at each students table, to help them with spelling.

While they were writing, I set up a voting booth and had the students come over one by one and vote for their favorite book.


Click here to see how I made this!

I explained to my students how when you vote, it is in secrecy. I called each student up one by one for them to choose which book they liked. I also had a copy of the book covers to help remind them. If the liked. They chose which book they liked and turned in their ballot.

My parents voted early and they got voting stickers for me. So when each student was done, I gave them an "I voted" sticker.

I tallied up the votes and at the end of the day I announced the winner. I taught them how to do a drum roll, and the winner was.......
Pete the Cat and His Four Groovy Buttons!!

Next week we will read two more Pete the Cat books and the winner of that will move onto the next round. We will keep going until we are down to one book!

I am really happy with how this lesson turned out and that I got to teach my students about voting.

Monday, October 22, 2018

ELA Lesson: Punctuation

Hello!

I was back in the field today and decided to do a grammar lesson. For my edTPA I decided I want to do a 3 day unit on writing. My class is going to write a narrative story, and I am preparing for it now. First step: Punctuation. I need to make sure my class understands how to end their sentences. We focused on periods, exclamation points and question marks. (This lesson is about 45 mins)

I started my lesson by asking my class what they know about sentences and punctuation. All of them were able to answer that periods go at the end and sometimes exclamation points and questions marks. However, none of them knew when to use them or why you use them. I started off by telling them all about periods and when we use them at the end of the sentence. I first asked them and then told them the definition. I made vocabulary cards and showed the one that talks about periods and told them how we use them at the end of a sentence when we are telling someone something or stating a fact. I then cut out a period and showed them what it looks like. After as a class we all went around saying sentences that would need a period.  (Ex: I like ice cream. *Insert students name* go pick up the pencil please.-one of my students made sure we knew that we need to add please when we are asking someone to do something)

Next, we talked all about question marks. I again asked the students what they knew about question marks and then showed them the vocabulary card and cutout question mark I made. I proceeded to tell them that you use a question mark when your sentence is asking a question. We all went around the room giving sentences that are asking questions. (Ex: Do you like ghosts? Do you like to read?)

Finally, we talked about exclamation points. I asked my students when we would use this in a sentence. One of them knew to use it when showing excitement. I was surprised and happy! I then showed them the vocabulary card and the exclamation point I made. I told them we use exclamation points when we want to show excitement, emotion, or feelings. I emphasized that we don't only have to use them when we are excited. I gave them them an example by saying: I don't like waking up early! I let them know I was showing the emotion of frustration because waking up early isn't fun for me. They then went around and gave sentences with various emotions that could have an exclamation point.
(Visual and Verbal learners)


Vocabulary Cards
Cutouts


Afterwards, we looked at the book Punctuation Station by: Elsa Bruno & Jenny Whitehead. I didn't have the book so we watched it on YouTube.
This book is awesome because it has a short poem about every single punctuation. We focused on the poems about periods, exclamation points, and questions marks.
After we watched the school house rock video "Interjections" to help reiterate again the exclamation points can help show ALL emotions, not just excitement.


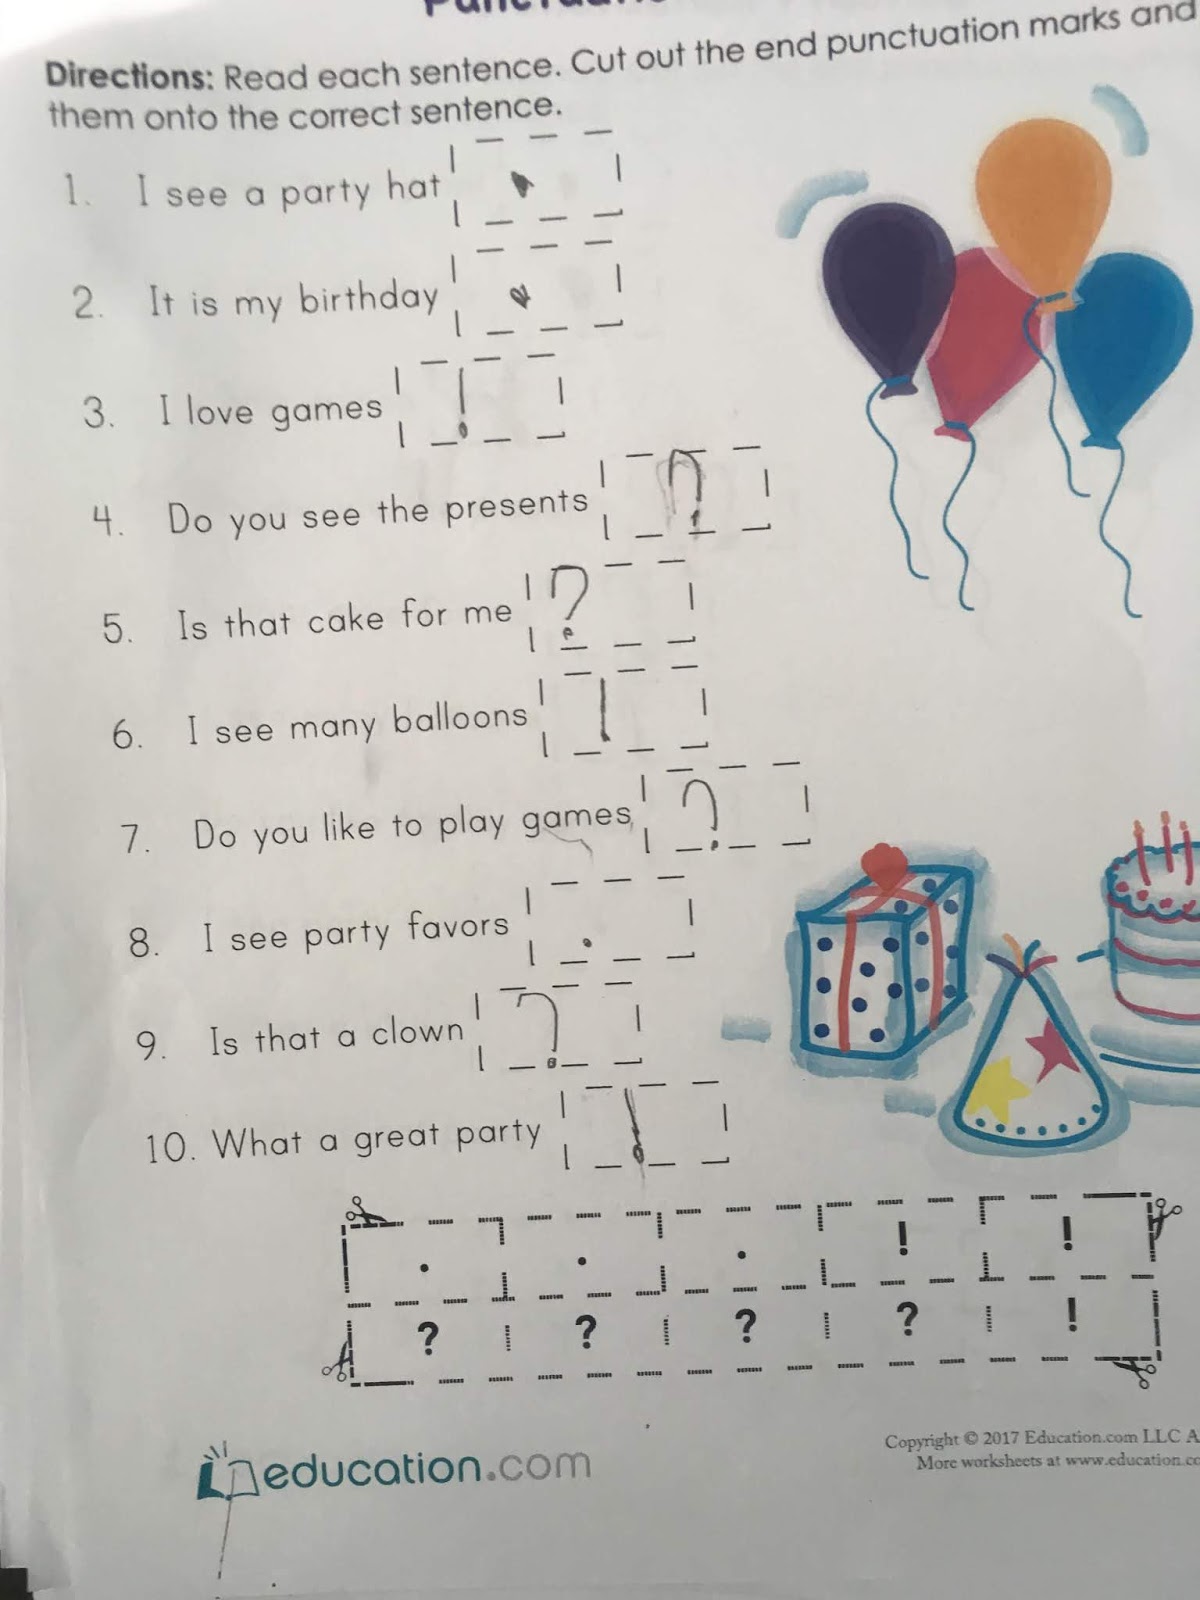
Next, we did a punctuation worksheet. The worksheet had 10 sentences and we had to figure out what punctuation goes at the end. You can do this worksheet anyway you like. 
My students can't read so I decided to do this worksheet as a group. I read the sentences with inflection to allow them to figure out if a period, question mark, or exclamation point was needed. We worked as a group to complete this worksheet. (Interpersonal learners)
You can also have your students cut out and glue the punctuation on the paper.

Lastly, we went outside and play Red light, Green Light- Punctuation Edition.  I got back out the cutouts I made.
First, the students all had to go to one end of the fence. When I held up green (exclamation point), the students had to run to me. When I held up yellow (question mark), students had to slowly walk to me. When I held up red (period), the students had to stop. The first person to make it to the other side of the fence and touch my hand won. If I held up the red, I would randomly call on students to tell me when we would use a certain punctuation. If they got it wrong, everyone had to go back to the fence and start over. The first person to touch my hand had to tell me when we use all three of the punctuations in a sentence.  If they got it wrong they had to go back and the game continued. If they got it right, then they won the game. (Kinesthetic learners). My students loved playing this game and it really helped them learn when to use what punctuation at the end of the sentence.

Now after doing this, I realized I maybe should have played this game with Mother May I. Red light green light got a little rough and I think Mother May I would have made the game more controlled. Before the students could take the requested steps forward, they would have to answer a punctuation question!

This lesson took about 45 minutes total and my students learned so much. I am so happy and I know this will help us when we write a narrative story next semester for my edTPA!